Installing Custom Python Packages In Fabric
Installing and managing Python packages in Microsoft Fabric

Principal Program Manager, Microsoft Fabric CAT helping users and organizations build scalable, insightful, secure solutions. Blogs, opinions are my own and do not represent my employer.
Updated : Aug 31, 2023
In Microsoft Fabric, you can install Python libraries from PyPI and conda feeds. You can install at the workspace level or the session level in notebooks. Before I show how to install custom Python packages, a quick recap of installing standard libraries.
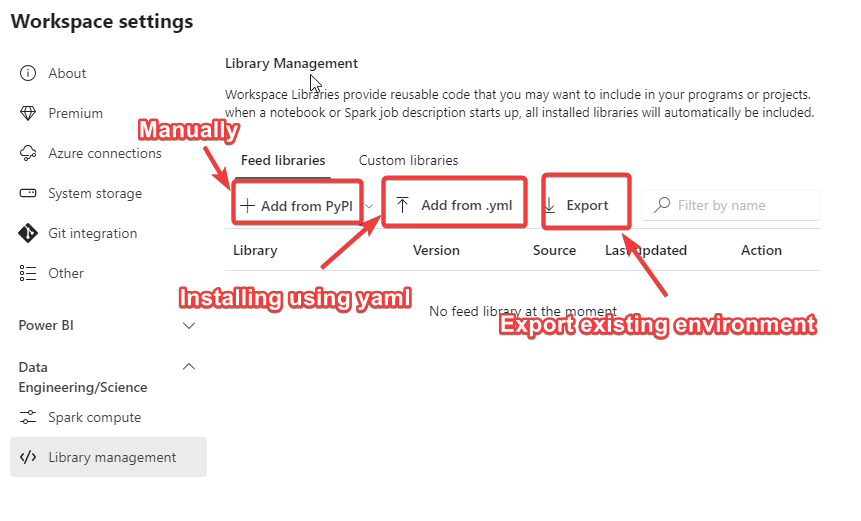
Workspace Library Management
Any libraries installed at the workspace level will be available for all notebook sessions in that worskspace.
You can manually install libraries one at a time using PyPI or conda channels. You can also upload YAML file with the required libraries to install a number of libraries. If you have an existing workspace with a number of Python libraries installed, you can export the YAML file and add it to the new workspace to replicate the environment.
Currently, multiple environments are not supported so you will have only one virtual environment per workspace. This will change in the future. Also, note that installing custom libraries will slow down the spark cluster start-up time. Only install the libraries you need.
To get a list of default libraries installed on the cluster, use the notebook and run !pip list . Unlike AzureML, the list of default libraries is not published in the documentation yet.
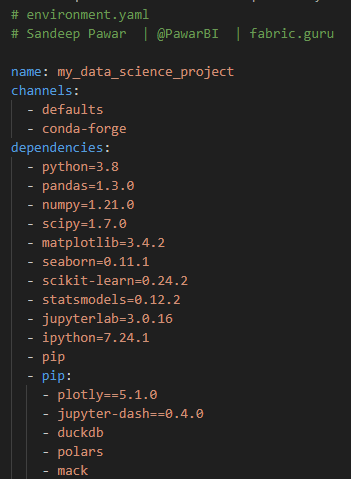
Below is a sample YAML file:
In-line Installation
You can install libraries at the session scope in a notebook by running !pip install <library name> or !conda install <library name> . You can also use %pip install which will install on driver and executor nodes of the spark cluster whereas !pip installs only on the driver node. If you have several libraries you want to install using PyPI, you can create a requirements.txt file, save it to the lakehouse and install. Read this article for instructions to create and use requirements.txt.

Custom Python Packages
What if you have custom Python functions and packages? You can build a wheel package for your Python files and install it at the workspace or session level. Let's say you want to use my check_vorder function in all of your notebooks in a workspace. I am going to call my package needles (needles to build Fabric, get it 😜 ). This package has the above function. Below are the steps to build the wheel file.
Create a folder with the below structure:
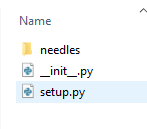
setup.pyhas the information regarding the package and the dependencies:## Sandeep Pawar | fabric.guru ## ## setup.py from setuptools import setup, find_packages setup( name='needles', #needs to build fabric version='0.0.1', url='https://www.fabric.guru', author='Sandeep Pawar', author_email='pawarbi@outlook.com', description='Utilities for Microsoft Fabric', packages=find_packages(), install_requires=['pyarrow'], )init.pycan be blank. I like to add a function to check if it has been imported successfully:## __.init__.py def function_init(): print('Successfully Imported Init.py')
needles folder has: init and the python file with my function

check_vorderhas the below function:## check_vorder function def get(table_name_path): ''' Author: Sandeep Pawar | fabric.guru | Jun 6, 2023 Provide table_name_path as '//lakehouse/default/Tables/<table_name>' If the Delta table is V-ordered, returns true; otherwise, false. You must first mount the lakehouse to use the local filesystem API. ''' import os if not os.path.exists(table_name_path): print(f'{os.path.basename(table_name_path)} does not exist') result = None # Initialize the variable with a default value else: import pyarrow.dataset as ds schema = ds.dataset(table_name_path).schema.metadata is_vorder = any(b'vorder' in key for key in schema.keys()) if is_vorder: result = str(schema[b'com.microsoft.parquet.vorder.enabled']) else: result = "Table is not V-ordered" return resultNow you just need to build the wheel by going to the directory with the setup.py file and running the command
pythonsetup.pybdist_wheel. Be sure you have wheel installed (!pip install wheel)

This will package your Python files in a wheel file. You will find it in the dist folder in the same directory.

Installing wheel in the workspace
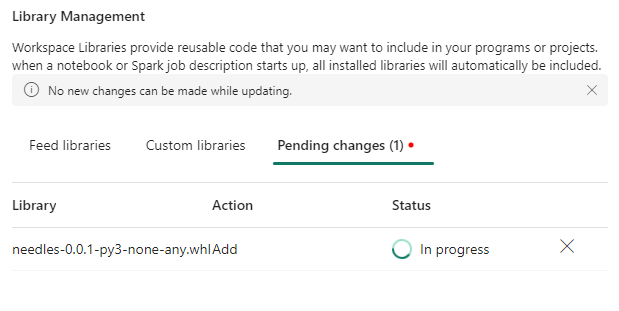
To install it in the workspace, go to Library Management in the workspace settings. Under Custom libraries, select upload and add the newly created whl file. This can take a while.

There is no way to download a whl file uploaded here. Also, there is no central repository where the tenant admin can upload custom packages to make them available to all/selected workspaces. That would be a great feature.
Once successfully uploaded, the package would be available for use in all future sessions:

Installing wheel in session scope
You can also save the wheel file to a lakehouse just like any other file and install it in-line. Unlike workspace installation, this can be used across workspaces.

Once support for virtual environments becomes available, it will make managing environments and dependencies for multiple projects much easier. Until then, if you need to isolate environments, either create multiple workspaces (not practical ) or install in-line (increases run time).
Update:
While you can use the Files section in the lakehouse to upload the whl and py files, there is now a dedicated location per notebook where you can upload "notebook resources".

It will always stay attached to the notebook and can be referred to in the pipelines too. There is one catch, I am not sure if it's a bug or now. If you use the relative path "/builtin/...", installation will not work. Instead, use
path = mssparkutils.nbResPath + "/builtin/<>package_name>.whl"
%pip install path

You can download the above whl packages from here. Note that the process for py, jar and tar.gz (R) files is the same.