Exporting Power BI Reports And Sharing With Granular Access Control In Fabric
Using Semantic Link and data access control to export & distribute Power BI report PDF extracts securely
Principal Program Manager, Microsoft Fabric CAT helping users and organizations build scalable, insightful, secure solutions. Blogs, opinions are my own and do not represent my employer.
There are several different ways to export a Power BI report as PDF, PPTX etc. Users can do it manually, via subscriptions, API, Power Automate and couple of other ways. All work but with Fabric, and especially with Semantic Link, it became very easy. Plus, with the recent announcement of OneLake Data Access Control, you can add a security layer in the Lakehouse to ensure users are able to access only the extracts they have been granted access to.
Before I begin, I want to thank Michael Kovalsky and Aaron Merrill at Microsoft for collaborating and answering my questions. I will be using Michael's fabric_cat_toolslibrary. If you have not checked it out yet, I highly recommend taking a look.
With the proposed solution below, you will be able to :
Export a Power BI report, or a page of a report or a specific visual from any page as a PDF, PNG, PPTX or other supported file formats
Apply report level filters before exporting
Automate the extracts on a schedule
Save the exported reports to specific folders
Grant access to individual folders in the Lakehouse
This does not obviate the need for a Paginated Report since you can't create pagination but I have worked on several projects where users want the PDF extracts or I have had to create Paginated Reports that could have been Power BI reports. Below, I will not share dynamic/interactive filtering. I will cover it in a future blog on how users can specify their own filters and folder location to save the exported files on demand, similar to Paginated Reports.
Exporting The Power BI Report:
You can useExport To File API to export any Power BI report. You can use the PowerBIRestClient in Semantic Link to do so easily. However, Michael has a convenient wrapperexport_report to do it and provides an easy way to pass the filter expressions.
%pip install "https://raw.githubusercontent.com/m-kovalsky/fabric_cat_tools/main/fabric_cat_tools-0.3.1-py3-none-any.whl"

#example code
import fabric_cat_tools as fct
fct.export_report(
            report = 'AdventureWorks'
            ,export_format = 'PDF'
            ,page_name = 'ReportSection293847182375'
            ,report_filter = "'Product Category'[Color] in ('Blue', 'Orange') and 'Calendar'[CalendarYear] <= 2020"
            ,workspace = None
            )
In my example, I want to apply filter based on Store column in Store table in the semantic model and save all pages to the respective folders.

In the below highly commented code, I first build the filtering logic using a dictionary. You can implement your own logic, make it as simple or complex as needed. Specify the folder lakehouse location and the file name.
Note the filter string. If you used the API, you will have to specify the filter using a not-so-obvious filter expression such as URL?filter=Table/Field eq 'value' . But Michael has simplified it, you can use 'Table'[Column]="value". The function automatically resolves it to the correct filter expression.
/lakehouse/default/Folder/<path> to specify the location.#build the filter logic. e.g. in the below dictionary the key is the folder where I want to
#save the file and the value associated with that key is the filter I want to use
#you can create custom filtering options based on your requirements (e.g. year, month, store etc)
import sempy.fabric as fabric
import fabric_cat_tools as fct
folder_filter_dict = {"Fama Stores":"Fama", "Contoso Stores":"Contoso", "Leo Stores":"Leo"}
#Relative Path where the exported reports should be saved
path = "Files/Exported_Reports_PDF"
for folder in folder_filter_dict.keys():
#check if the folder exists, create the folder if it does not exist
if not mssparkutils.fs.exists(f"{path}/{folder}"):
print(f"Folder {f} does not exist at {path}.. creating it")
mssparkutils.fs.mkdirs(f"{path}/{folder}")
try:
print(f"---->Exporting to {folder} folder")
fct.export_report(
#name of the report you want to export
report = 'Sales & Returns',
#name of the workspace where this report exists. If None, current workspace will be used
workspace = 'Sales Workspace',
#file format, e.g. pdf, png, pptx etc.
export_format = 'PDF',
#report level filter to apply using filter expression
#change this based on your requirements
report_filter = f"'Store'[Store] = '{folder_filter_dict[folder]}'",
#path and name of the file. do not add file extension such as .pdf, .png
#you must mount a deault lakehouse
file_name=f'/lakehouse/default/{path}/{folder}/{folder_filter_dict[folder]}',
#name of the report page you want to export. Use the ReportSection#### from the URL
#page_name = None,
#name of the visual. Must specify the page_name if visual_name is specified
#To get the visual name, right click a visual in service > Share > Link to visual > you wil see the visual name
#visual_name=None
)
except:
print("Error exporting to {folder}")
After executing above code, the reports were exported as below:

If you re-run the code, it will overwrite the existing files. You can suffix timestamps to file name if you want to keep a history of all the extracts.
Below is the exported PDF:

Some visual types may not be supported in the exported PDF so be sure to test it.
In a future blog, I will show how to use widgets + Semantic Link + Notebook permissions to mimic Paginated Report like interactive experience. Stay tuned !
Data Access Control
Once exported, I want to give granular access, i.e. only the users from Contoso stores should only have access to Contoso Stores folder etc. We can achieve this using Data Access Control in the Lakehouse. Note that data access control is currently in preview
Grant Read access to the Lakehouse
First step is to give Read access to the Lakehouse by unchecking all the boxes from Lakehouse sharing dialog box. This will enable metadata access to the Lakehouse.

You can read more about it here. A quick overview of different permissions is below. In my case the user does not have a workspace role.

Define Data access role:
Open the Lakehouse and select Manage OneLake data access
Create a new role (not the DefaultReader)
Select the folder to define the scope

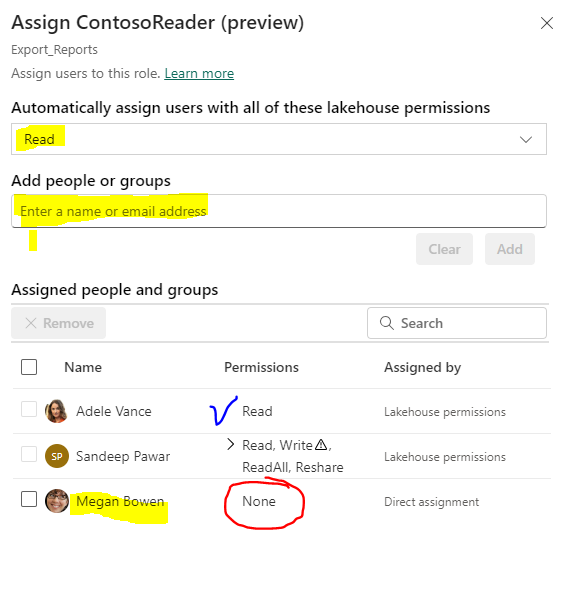
Assign role:
Select the newly created role and select Assign. Include users in Read permissions. This virtualizes all users with the checked permissions and includes in them in the role. Note below that the names of the users who have Read access to the Lakehouse automatically showed up with their respective item permissions. I entered user Megan Bowen but her Permissions is shown as None. That's because she does not have access to the Lakehouse. For her to see the folder contents, she must have workspace permissions or the item permissions.

The user will see the shared lakehouse in their Onelake data hub :
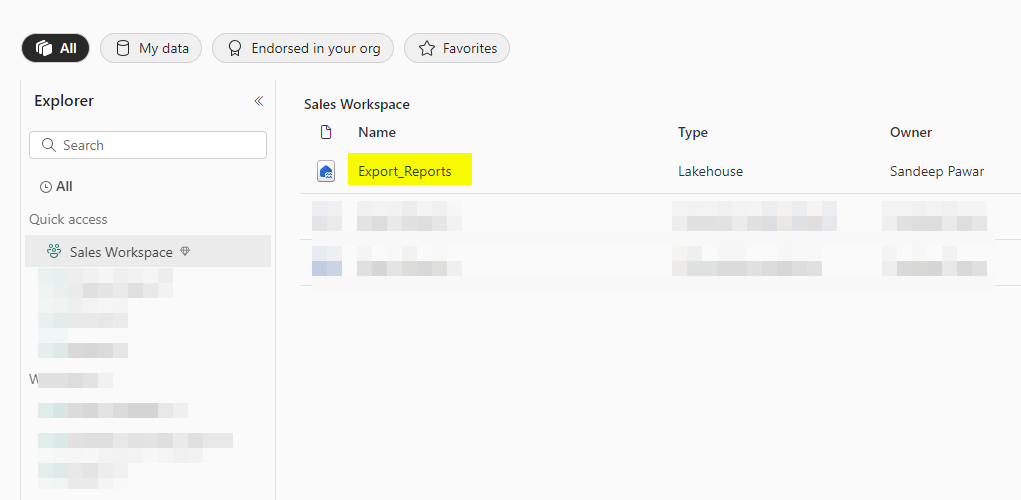
When they open the Lakehouse, they will see only the folder they have been given access to and not the other folders. The best part is that with the magic of Onelake Explorer, they will be able to access the exported reports on local machine, just like a OneDrive for business !

What About Custom Stylized PDF Reports?
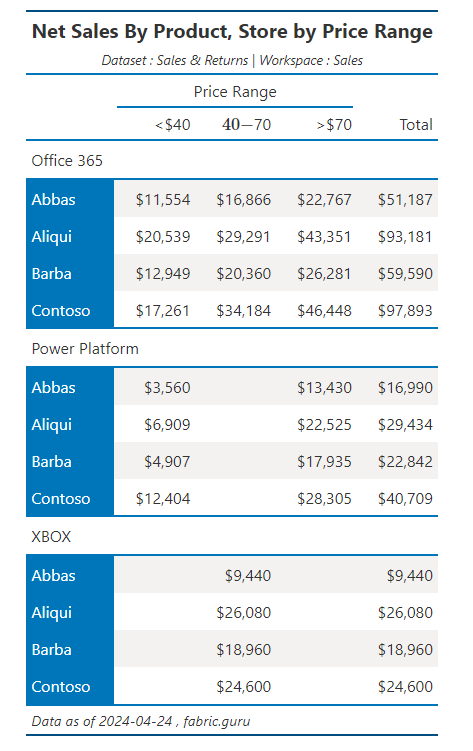
Absolutely ! With Semantic Link we can query the semantic model, transform it and with Python/R libraries create highly customized and stylized PDFs, Excel reports as needed and follow the same process as above to distribute it securely.
In the below example, I am using Semantic Link to query the dataset, great_tables to create a stylized report and Weasyprint to export it as a PDF to a Lakehouse location.
%pip install great_tables --q
%pip install WeasyPrint --q


import re
import pandas as pd
from datetime import datetime
from weasyprint import HTML
from great_tables import GT,md
import sempy.fabric as fabric


dax = """
EVALUATE
    VAR __filter =
        TREATAS({"Abbas",
            "Aliqui",
            "Barba",
            "Contoso"}, 'Store'[Store])

    VAR __table =
        SUMMARIZECOLUMNS(
            'Store'[Store],
            'Product'[Category],
            'Customer'[Price Range],
            __filter,
            "Net_Sales", 'Analysis DAX'[Net Sales]
        )
RETURN
__table
"""

result = fabric.evaluate_dax(dataset="Sales & Returns", workspace="Sales Workspace" , dax_string=dax)

result.columns = [re.search(r'\[(.*?)\]', item).group(1) for item in result.columns]

table = pd.pivot_table(data=result, columns="Price Range", index=["Store", "Category"], values="Net_Sales").reset_index()
table["Total"] = table.select_dtypes('float').sum(axis=1).rename("Total")
table = table[["Category","Store","<$40","$40 - $70",">$70", "Total"]]
result = (
    GT(table, rowname_col="Store", groupname_col="Category")
    .tab_header(
        title=md("**Net Sales By Product, Store by Price Range**"),
        subtitle=md("*Dataset : Sales & Returns | Workspace : Sales*" )
        )
    .tab_spanner("Price Range", columns = ["<$40","$40 - $70",">$70"])
    .fmt_currency(columns=['$40 - $70', '<$40', '>$70', "Total"], decimals=0)
    .tab_source_note(md(f"*Data as of {datetime.now().strftime('%Y-%m-%d')} , fabric.guru*"))
    .opt_stylize()
 )

#result

HTML(string=result.as_raw_html()).write_pdf('/lakehouse/default/Files/pdf_report.pdf')
Refer to the respective library documentation and API for details. great_tables has .as_pdf option to save the table directly as a PDF but it requires a browser to be installed which Fabric VMs do not have so I exported the HTML and used Weasyprint to create PDF. You know a better way, let me know.
In summary, Fabric notebooks, Semantic Link and the granular data access control open up many interesting use cases and applications to meet reporting and analytics needs while enforcing security. You can access the pbix I used from here.